
Guide
Quick start
Install Mini mPOS, connect it to Adyen and verify your first TEST payment. Follow only the steps for your device setup.
Just exploring? Try the simulator without an Adyen account or terminal.
Check the prerequisites
Check these requirements before you install the app. The device runs Mini mPOS; the payment terminal takes the card. They can be the same device.
Choose a device setup
- On an Adyen terminal
- The complete checkout on one device. Use an Adyen Android payment terminal with Android 9 or later. Check the current models in the Adyen Android terminal guide.
- Tablet or phone with a network terminal
- Recommended for a counter. An Android 9+ tablet or phone on the same local network as an Adyen terminal. Mini mPOS is not installed on that terminal.
- Tablet or phone with a cloud terminal
- For a device and terminal on different networks. Both need internet access; payments reach the terminal through Adyen.
- Tap to Pay on a phone
- No separate terminal. Use a phone with near-field communication (NFC) and the Adyen Payments app, activated by Adyen Support. Check the Adyen phone requirements and Adyen supported countries and payment methods.
- Printing needs a terminal with a built-in printer. If there is none, you can email or share receipts instead.
- Scanning barcodes, refund QR codes or setup codes needs a camera.
Prepare the network
Ask the site's network administrator to allow the following:
- Internet
- Outgoing HTTPS on TCP 443 from the device and terminal to
*.adyen.comand*.adyenpayments.com. Allow these by domain name, not IP address, because Adyen's IP addresses change. - Local network (for network terminals)
- The tablet or phone must reach the terminal's IP address on TCP 8443. Connect both to the same network, and make sure Wi-Fi client isolation (common on guest networks) does not separate them.
- Email receipts (optional)
- Outgoing access to your SMTP server, usually TCP 587 (STARTTLS) or 465 (SSL/TLS).
Give each network terminal a fixed IP address with a DHCP reservation in your router. Mobile data works for the tablet or phone in cloud and Tap to Pay setups, but not with a network terminal. For the terminal's own requirements, see the Adyen network configuration guide.
Prepare Adyen credentials
To validate with Adyen, you need an active test merchant account with in-person payments enabled and Customer Area access. Start with TEST credentials and a TEST terminal or Adyen Payments Test. For LIVE, use the corresponding live account, credentials and terminal or Payments app.
To create or edit credentials, your Customer Area user needs Manage API credentials or Merchant admin. These are user permissions, not roles for the API key.
Enable the POS payment methods you plan to accept; follow the Adyen payment method setup guide. Mini mPOS uses the terminal's configured methods.
- In the Customer Area, go to Developers › API credentials. Create a credential for Mini mPOS and generate its API key; see the Adyen API credential guide.
- For the main API key, enable these additional roles:
- Management API — Terminal actions read
- Management API — Terminal settings read and write
- Management API — Terminal settings Advanced read and write
- Cloud Device API role
- Merchant Recurring role
- Management API — Stores read
- Management API — Account read
- Management API — Payment methods read
- For LIVE, note the Live URL prefix from Developers › API URLs.
- For Tap to Pay only: create a second credential with only the Adyen Payments app role, for registering the phone. Have the shared key ready as described below.
- If you want to configure the device manually:
- Note the Merchant account.
- For an Adyen terminal, network terminal or Tap to Pay, find the Shared key (identifier, passphrase and version) under Devices › Device settings › Integrations › Terminal API › Encryption key. Cloud terminals do not use it.
Important
Mini mPOS has no server, so API keys are stored encrypted on the device. Create credentials only for Mini mPOS with only the API roles needed for your setup. Set an admin PIN, and revoke the credentials if a device is lost. See the security policy.
Note
Mini mPOS is independent; it is not made, endorsed or supported by Adyen. Follow Adyen's linked documentation for account and platform procedures.
Install the app
Download the signed minimpos-<version>.apk from the latest release.
- Adyen terminal
- In the Customer Area, upload the APK and deploy it to your terminals; see the Adyen app deployment guide. Your user needs permission to upload and deploy apps.
- Open Mini mPOS on the terminal and choose Set up a terminal.
- Tablet or phone
- Open the APK on the device and allow installation from your browser or file manager when Android asks.
- Open Mini mPOS and choose Set up a terminal.
Important
Install every update from the same signing source. A terminal rejects an update signed with a different key. To build and sign your own, see the contributor guide.
Connect to Adyen
Connecting pairs Mini mPOS with its terminal or the Adyen Payments app and checks your Adyen API key. Follow only the part for your setup. Each has two options: the setup helper (recommended), or manual entry in Settings › Terminal.
Scan setup codes from a computer
- On a trusted computer, open the setup helper. It works offline and sends nothing.
- Choose where Mini mPOS runs and the environment, TEST or LIVE.
- Choose Automatic (recommended) to enter only the Adyen API key; the device looks up the rest. Choose Manual to enter every connection detail.
- Enter the requested details.
- Click Make QR codes. Keep the page open: it shows the 12-character transfer code.
- In Mini mPOS, open Settings › Terminal and tap Scan setup codes or the QR icon at the top right. Scan every code.
- Check the destination and environment, enter the transfer code and tap Verify and import.
- If asked, choose your terminal, or register the phone for Tap to Pay. Nothing is saved until all checks pass.
Connect an Adyen terminal
Prerequisites
- Mini mPOS deployed to the terminal
- An Adyen API key from the terminal's environment
- Internet access for the terminal
- Setup helper (recommended)
- In the setup helper, choose On an Adyen terminal, the terminal's TEST or LIVE environment and Automatic. Enter the API key, then scan the codes.
Manual
- In Settings › Terminal › Adyen API, enter the Adyen API key and merchant account, plus the live URL prefix for LIVE. Tap Test API, then optionally Find setup to fill in the shared key.
- Check or enter the shared key and tap Test connection.
Pair a terminal on your network
Prerequisites
- Mini mPOS installed on the tablet or phone
- An Adyen API key from the terminal's environment
- The device and terminal on the same network, with TCP 8443 open between them
- Setup helper (recommended)
- In the setup helper, choose On a tablet or phone, with a terminal on the same network, the terminal's TEST or LIVE environment and Automatic. Enter the API key, then scan the codes. If more than one terminal is found, choose yours.
Manual
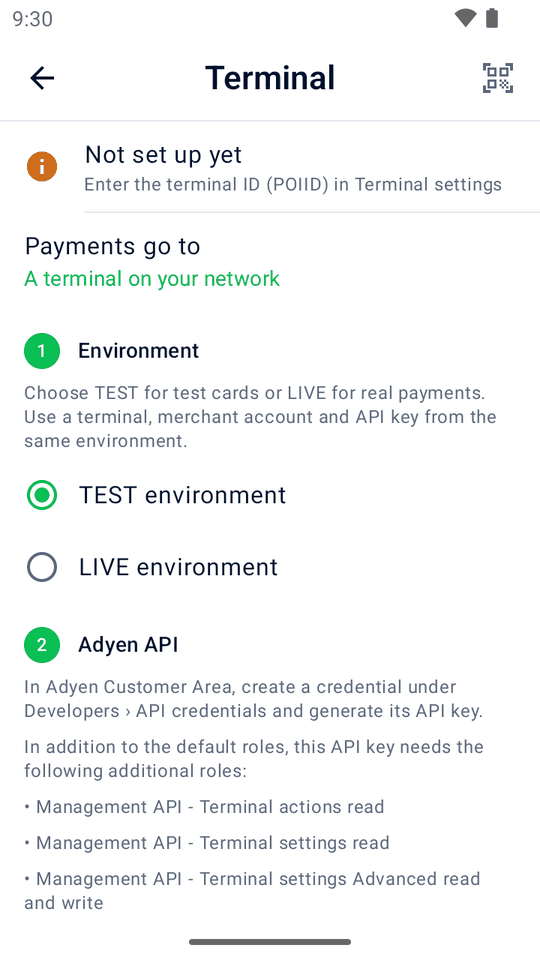
- In Settings › Terminal, set Payments go to to A terminal on your network. Under Environment, choose TEST or LIVE to match the terminal.
- Under Adyen API, enter the Adyen API key and merchant account, plus the live URL prefix for LIVE. Tap Test API, then optionally Find setup and choose the terminal.
- Check or enter the terminal's IP address and Terminal ID (POIID). Both are on the terminal's Device info screen.
- Check or enter the shared key and tap Test connection.
Connect a cloud terminal
Prerequisites
- Mini mPOS installed on the tablet or phone
- An Adyen API key with the Cloud Device API role, from the terminal's environment
- Internet access for the device and the terminal
- Setup helper (recommended)
- In the setup helper, choose On a tablet or phone, with a terminal over the internet (cloud), the terminal's TEST or LIVE environment and Automatic. Enter the API key with the Cloud Device API role, then scan the codes. If more than one terminal is found, choose yours.
Manual
- In Settings › Terminal, set Payments go to to A terminal over the internet (cloud). Under Environment, choose TEST or LIVE to match the terminal.
- Under Adyen API, enter the Adyen API key and merchant account, plus the live URL prefix for LIVE. Tap Test API, then optionally Find setup and choose the terminal.
- Check or enter the Terminal ID (POIID) and tap Test connection.
Set up Tap to Pay
Prerequisites
- Tap to Pay and the Adyen Payments app role enabled for your company by Adyen; contact Adyen Support
- Mini mPOS installed on a supported phone
- An Adyen API key, a separate Payments app API key and the shared key
- From Google Play, install Adyen Payments Test for TEST or Adyen Payments for LIVE, not both.
- In Mini mPOS, open Settings › Terminal and select Tap to Pay on this phone.
- Setup helper (recommended)
- In the setup helper, choose On a phone, with Tap to Pay in the Adyen Payments app and the installed app's TEST or LIVE environment. Enter the Adyen API key, merchant account, Payments app API key and shared key, and optionally a store ID. Scan the codes and register the phone when prompted.
Manual
- In Settings › Terminal › Adyen API, enter the Adyen API key and merchant account. For live payments, also enter the live URL prefix. Tap Test API.
- Under Tap to Pay, enter the Payments app API key with only the Adyen Payments app role. Optionally enter a store ID.
- Tap Set up Tap to Pay and complete registration in the Payments app.
- In Mini mPOS, enter the shared key.
The Payments app cannot run a connection test, so confirm the setup with a TEST payment. To unregister the phone later, use Remove this phone.
Create a missing encryption key
If a physical terminal has no encryption key yet, setup offers Create encryption key after the credential and account checks pass.
- Check the terminal ID and environment shown, then confirm. Do not change this terminal's settings elsewhere while the key is created.
- If the connection is not verified yet, update the terminal's configuration; see key setup recovery.
- If creation is interrupted, tap Resume key setup. For QR setup, scan the same codes again with their transfer code.
Validate your TEST setup
- In Settings › Terminal, check that the environment is TEST. Run Test API and check it passes.
- Physical terminal: run Test connection and check it passes.
- Tap to Pay: confirm the phone is registered in Adyen Payments Test. There is no connection test; the payment below validates the setup.
- In Settings › Payments, check the currency. In Settings › Tax, check the rates and whether prices include tax.
- On Home, tap New sale, add a Custom item and tap Charge.
- Tap Pay and follow the Adyen POS testing guide for a successful payment.
- Check that the result is approved and the receipt has the correct amount, currency and tax. Open the sale in History. Match its PSP reference to the payment in the TEST Customer Area.
- Refund the payment and check the final refund outcome in the TEST Customer Area. Refund requested is not final confirmation.
- Repeat the sale with a refused-payment scenario from the Adyen POS testing guide. Check that Mini mPOS shows a decline, not an approval; see declined payments.
Warning
If the result is unknown, do not pay again. Follow the recovery steps first.
Next, set up products, receipts and staff access in Using Mini mPOS.
Go live
- In TEST, try only the optional workflows you plan to use: deposits, receipt tips, payment links or scanned wallets. Deposits and receipt tips hold funds until capture. Check final capture outcomes in the Customer Area.
- Test the receipt delivery methods you plan to use: print on a real printer, send a test email or share a receipt.
- Set an admin PIN and, if needed, a Manager PIN; see staff access.
- Switch to the LIVE terminal or the LIVE Payments app, with LIVE credentials. For a network or cloud terminal, choose LIVE under Environment. Enter the Live URL prefix; see the Adyen live endpoints guide.
- In Settings › Terminal, run Test API and check it passes. Check that the environment is LIVE.
- Physical terminal: run Test connection and check it passes.
- Tap to Pay: confirm the phone is registered in the LIVE Adyen Payments app. There is no connection test.
Warning
Switching between TEST, LIVE and the simulator deletes all payment history on the device, including recovery data for unfinished payments. Resolve every payment under Needs attention first.
For daily checks and reconciliation, see Close the day.
Try the simulator
Explore Mini mPOS without an Adyen account or terminal. No card is charged.
- Install the app on an Android 9+ phone or emulator.
- On the welcome screen, choose Try simulator with samples. The other choices are Set up from another device, to import setup QR codes, and Set up a terminal.
- In Settings › Simulator, choose the payment outcome, the delay and whether a printer is available.
Sample products and history are labeled as demos. Samples count in demo day totals and reports; they are not real payments. In Settings › Data, use Add sample data or Remove sample data; removal keeps your own products, history and settings. For offline demo links, see payment links.